6 Methods to Share a Filtered Database in Notion
As a marketing agency owner, you handle multiple client projects and manage a vast number of articles. You have a master Notion database for all your content. However, sharing the right pieces with the right clients can feel overwhelming. What if you could filter and share just the relevant content with each client, without exposing your entire database? This article covers six effective methods to share filtered Notion databases. It includes built-in features and advanced automations to keep your client data organized and secure.
Is it Possible to Share a Part of a Notion Database?
Why it is Not Possible to Create Filtered Databases Using Notion
Notion's database sharing has a catch: you can't directly share a filtered view. When you share a database, recipients get access to everything, regardless of any filters applied. This limitation comes from Notion's design, which emphasizes collaboration and transparency over detailed access control.
For instance, if you're managing articles for multiple clients in a single database, you've organized everything with a "Client" property. However, when you share, Notion doesn't respect your filters. Your client from Company A could see articles for Company B. Not ideal, right?
Common Use Cases for Filtered Databases
Even with this limitation, sharing filtered databases is common across various scenarios:
- Client-specific content sharing: Share only relevant articles with each client.
- Project management: Share task lists filtered by project or department.
- HR processes: Share employee databases filtered by department or role.
- Product catalogs: Share product databases filtered by category or availability.
- Event planning: Share attendee lists filtered by event or registration status.
- Educational content: Teachers or course creators might want to share specific lesson plans or resources with different student groups.
These use cases show the need for workarounds to Notion's sharing limitations. Sharing filtered views would streamline workflows, enhance privacy, and improve the user experience for database owners and recipients.
Methods to Share a Filtered Database in Notion
Advantages and Disadvantages of Different Methods
| Method | Advantages | Disadvantages |
|---|---|---|
| Create and Share Two Databases | - Full control over shared content - Easy to update | - Manual syncing required - Potential for data inconsistencies |
| Publish a locked database | - Simple to set up - Prevents unauthorized access | - Limited to web publishing - Lacks real-time updates |
| Share Using "Can Edit Only" Option | - Maintains database structure - Allows controlled collaboration | - Requires Notion Plus plan - Risk of data export |
| Using Notion Automations | - Automatic updates - Customizable triggers and actions | - Limited to paid plans - Potential for sync delays |
| Creating a Make/n8n Automation | - Highly customizable - Works across platforms | - Requires technical setup - Potential costs for external services |
| Using External Sync Tools | - Purpose-built for database syncing - Often user-friendly | - Additional cost - Reliance on third-party services |
Create and Share Two Databases
Duplicate the Master Database
The first step is to create a duplicate of the master article database. This new database will serve as the client-facing version. Here's how to do it:
-
Open the master database in Notion.
-
Click the three dots (...) in the top right corner.
-
Select "Duplicate."

-
Select if you prefer to duplicate with or without the items
Share the Public Database
Once the client-facing database is created, share it with clients:
-
Open the public database.
-
Click "Share" in the top right corner.
-
Choose the appropriate sharing settings:
- "Share to web" for public access.
- "Invite" for specific users or groups.
-
Set permissions (e.g., "Can view" or "Can comment").
-
Copy the generated link.
You can now send this link to clients, giving them access to a curated version of the article database.
Tips: Creating a "Sync" Page for Easy Updates
To streamline updates, create a "Sync" page:
-
Create a new page in Notion called "Article Sync."
-
Add two linked databases to this page:
- The original master database.
- The client-facing "Client Articles" database.
-
For the master database view, create a filter like: "Ready for Client" is "Yes.", or "Client = Client A"
This setup allows for easy drag-and-drop updating. When a new article is ready for a client:

- Navigate to the "Article Sync" page.
- Find the new article in the master database view.
- Drag it to the client database.
- The article will now appear in the client's shared view.
By using this method, you can maintain a clear separation between internal and client-facing content. This system, while manual, offers complete control over what information is shared with clients.
If you want to keep the items in both databases, hold Alt while drag-and-drop. It will allow items to be copy-pasted, and not cut-pasted.
Add a "Last Synced" date property to your master database. Update this whenever you move an article to the public database. This helps track what's been shared and when.
Publish a Locked Database
Difference Between Filters and Advanced Filters
Understanding the distinction between regular filters and advanced filters is crucial when publishing a locked database.
Regular filters:
- Visible to anyone with access to the database.
- Easily modified by users.
- Ideal for personal use or within a trusted team.
Advanced filters:
- Hidden from view in shared pages.
- Cannot be altered by viewers.
- Perfect for creating locked, curated views for clients.
Using advanced filters ensures that clients only see their relevant articles without being able to modify the filter settings.
Removing the Breadcrumbs
Sharing Notion databases comes with the challenge of breadcrumb navigation, which can expose the original database structure. Here's a workaround:
-
In the master database, create a new view with an advanced filter.
-
Set the filter to hide all entries (e.g., "Name" is empty).

-
Remove all other views from this database.
Now, even if a client clicks on the breadcrumb, they'll see an empty database, protecting fully your content.
To implement this for client sharing:
- Create a new page titled "Client Articles."
- Add a linked database to this page, connecting to the master database.
- Apply an advanced filter to show only the specific client's articles.
- Lock the database view.
- Share this page as a web page with "Can view" permissions.
This method allows you to share a filtered, locked view of articles with each client. Clients can browse their assigned content without accessing or even knowing about the existence of other clients' articles.
For your internal use:
- Create another linked database of the master database.
- Remove the "hide all entries" filter.
- This serves as the functional view of all articles, accessible only by you and your team.
By using this approach, you can maintain a single source of truth in the master database while providing secure, client-specific views of relevant content.
Want to supercharge your productivity?
Unlock the full potential of Notion & Obsidian with our plugins.
Share Using the "Can Edit Only" Option
Explanation of the "Can Edit Only" Permission
The "Can edit only" permission in Notion offers a balance between full access and view-only rights. This option allows clients to interact with their specific content without giving them control over the entire database structure.
Key features of "Can edit only":
- Users can create, edit, and delete pages within the database.
- Property values can be modified.
- Database properties, views, filters, and sorts remain locked.
How to Set It Up
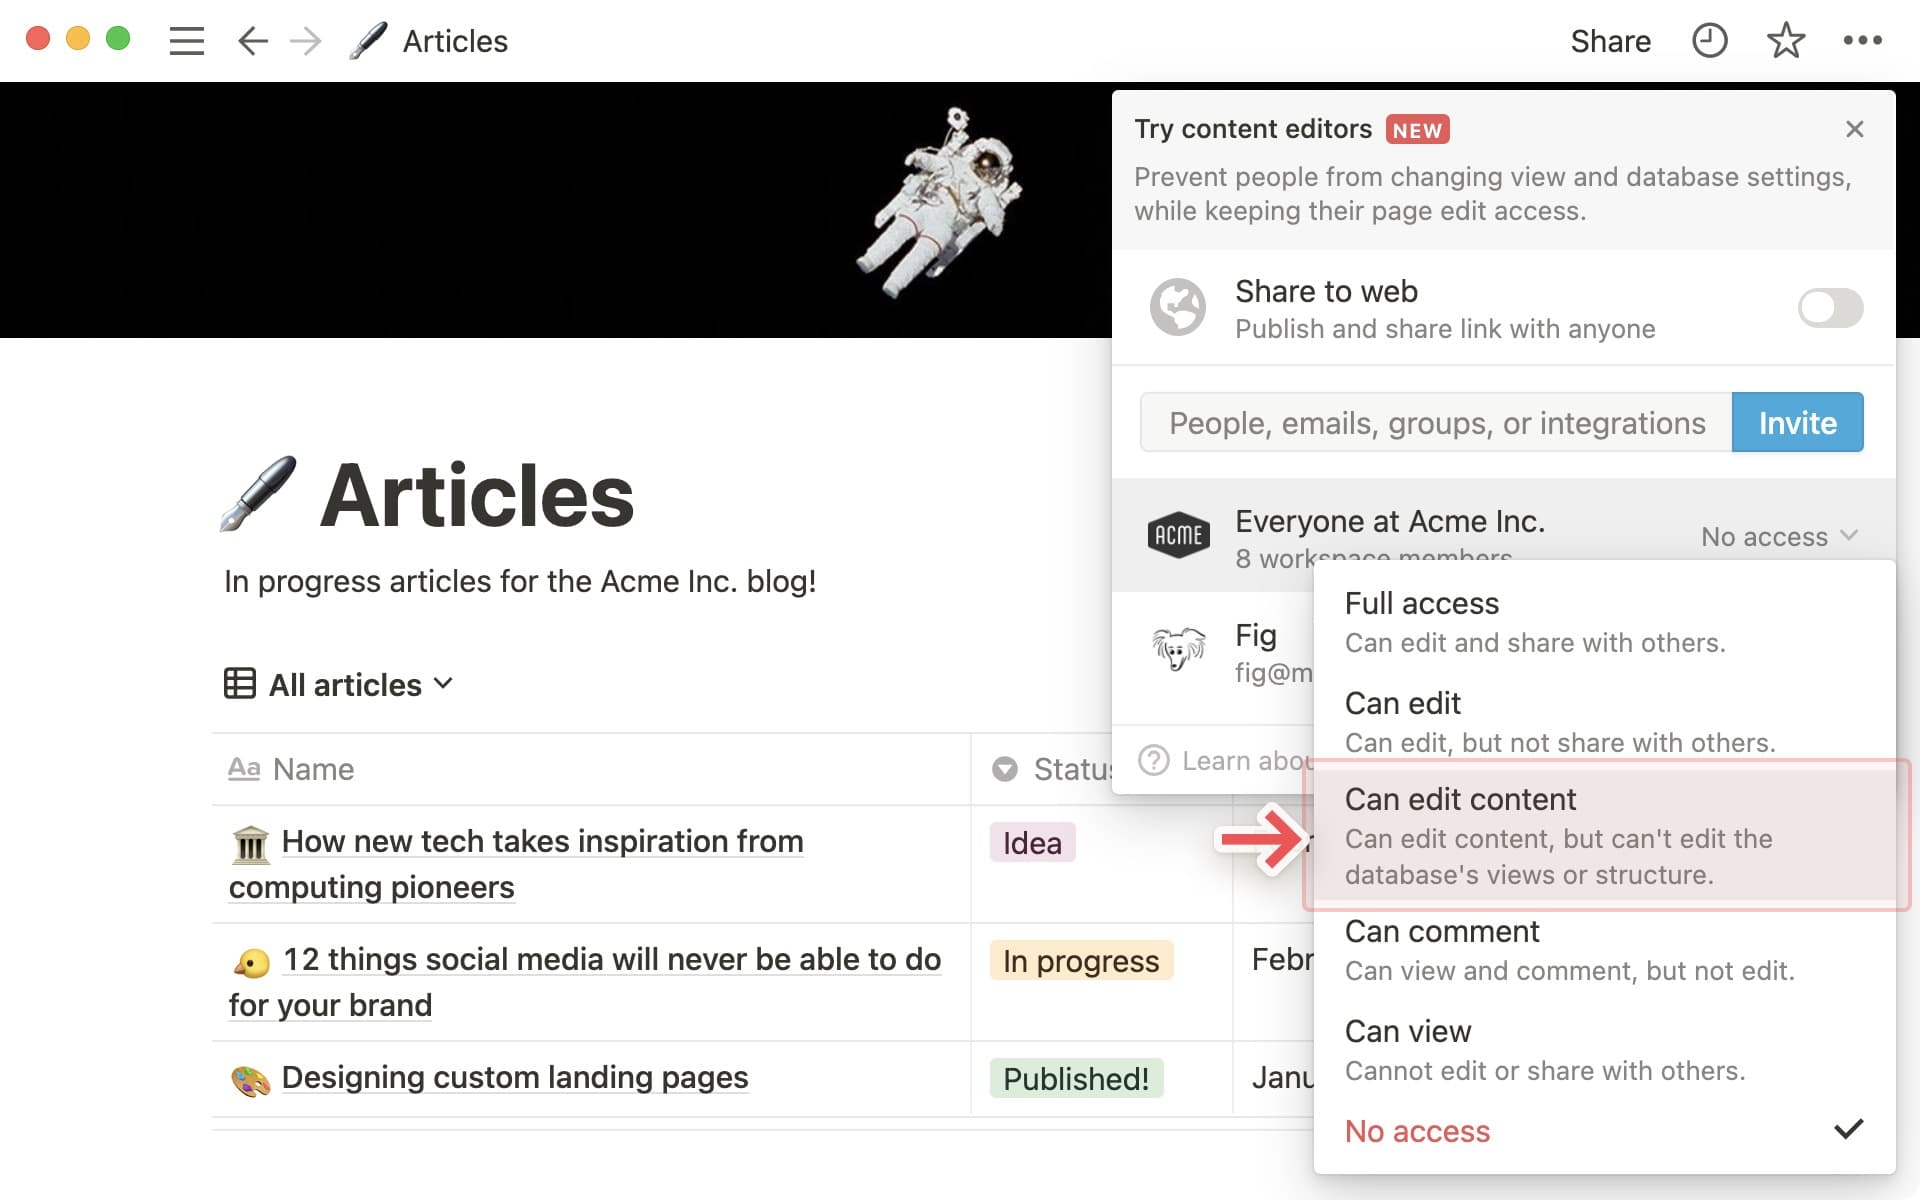
- Open the master article database.
- Click "Share" in the top right corner.
- Select "Invite" and enter the client's email.
- In the dropdown menu, choose "Can edit content"
- Optional: Add a personal message explaining the access level. 6. Click "Invite."
Best Practices for Maintaining Data Integrity
"Can edit only" offers control but requires careful management. To maintain data integrity:
- Use property locking: Lock crucial properties like "Client" to prevent accidental changes.
- Create backup views: Maintain a separate, admin-only view of the database.
- Implement regular audits: Periodically review client-editable content for accuracy.
- Provide clear guidelines: Explain to clients what they can and should edit.
Scenarios Where This Option Is Most Effective
The "Can edit only" option works well in situations like:
- Collaborative content calendars: Clients can update article statuses or add comments without altering the overall structure.
- Feedback collection: Clients can directly input their thoughts on articles in designated properties.
- Project tracking: Allows clients to update progress or add notes to their specific projects.
- Resource libraries: Clients can add their own resources to a shared knowledge base.
This method allows for a more interactive client experience. For instance, clients could mark articles as "Approved" or "Needs Revision" directly in the database, streamlining the feedback process.
There's also a potential security risk: clients can still export the complete database content, regardless of applied filters. This means sensitive information could be exposed if not carefully managed in the shared database view.
Note that this feature requires a Notion Plus plan ($10/month).
Using Notion Automations
Overview of Built-in Notion Automation Features
The Notion automations enable dynamic updates and notifications based on changes in the database.
Key automation capabilities:

- Automatically update related databases.
- Send notifications to team members or clients.
- Create new pages or items in other databases.
How to Set Up Automations to Keep Databases in Sync
Here's how to create an automation to sync the master database with a client-specific one:
-
In the master database, click "..." > "Automations."
-
Select "New Automation."
-
Choose a trigger: "When a property is changed."
-
Set the property to "Client" and specify the client's name.

-
Add an action: "Create page in database."
-
Select the client-specific database as the target.
-
Map the relevant properties from the master to the client database.
-
Save the automation.
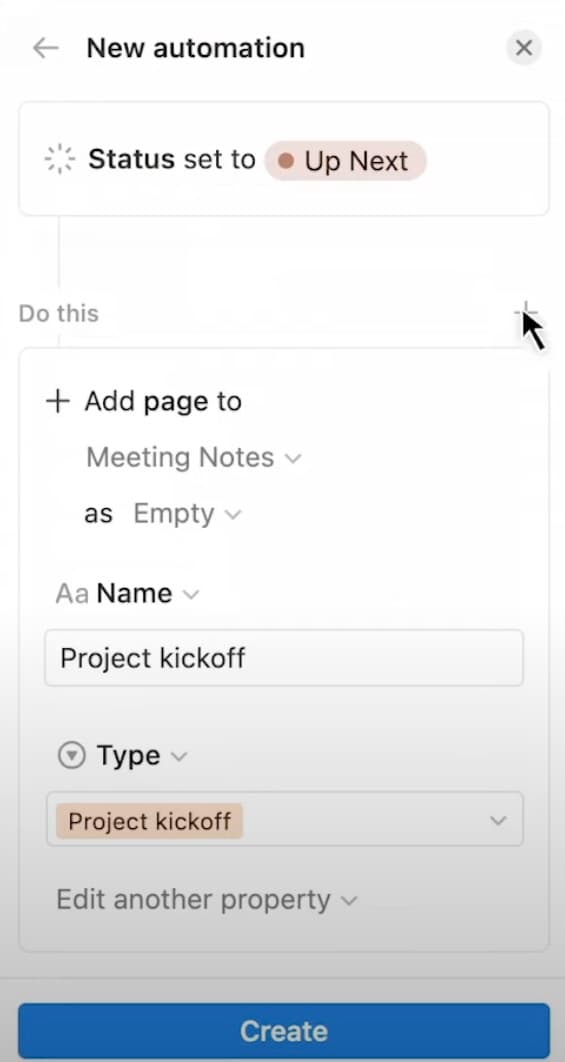
Now, whenever an article in the master database is assigned to a specific client, it will automatically appear in their dedicated database.
Use Cases for Automatic Database Updates
- Content approval workflow: Automatically move approved articles to the client database.
- Deadline notifications: Send alerts to the team when article due dates approach.
- Client feedback integration: Update article status in the master database based on client input.
- Cross-database tagging: Automatically tag articles in the client database based on categories in the master.
- Content is checked as ready.
Using Notion's built-in automations can significantly streamline the process of sharing filtered content with clients.
However, these advanced features are only available on Notion's paid plans, starting at $10/month for the Plus plan.
By leveraging these automations effectively, the agency can maintain a single source of truth in the master database. This ensures each client has access to their relevant, up-to-date content without manual intervention.
Creating a Make/n8n Automation
Step-by-Step Instructions to Create Automations (1-way Sync)
Seeking advanced automation options, platforms like Make (formerly Integromat) or n8n offer powerful solutions. Here's how to set up a 1-way sync using Make:
- Create a new scenario in Make.
- Add a Notion module as the trigger: "Watch Database Items."
- Configure it to monitor the master article database.
- Set up filters to only process items for a specific client.
- Add another Notion module: "Create a Database Item."
- Configure this to add items to the client-specific database.
- Map the relevant fields from the master to the client database.
- Set up error handling and notifications.
- Schedule the scenario to run at regular intervals (e.g., every 15 minutes).
This setup ensures that new or updated articles for a specific client are automatically synced to their dedicated database.
2-Way Sync
For a more robust solution, implement a 2-way sync:
-
Create two separate scenarios in Make.
-
Scenario 1: Master to Client (as described above).
-
Scenario 2: Client to Master
- Trigger: Watch the client database for changes.
- Action: Update the corresponding item in the master database.
-
Add filters to prevent infinite loops:
- Only sync items where "Last edited by" is not the automation tool.
- Use a "User Update?" formula property to distinguish manual edits.
This 2-way sync allows clients to make changes (e.g., add feedback) that reflect back in the master database, while still maintaining overall control.
Key Considerations for 2-Way Sync:
- Carefully manage permissions to prevent unintended edits.
- Implement conflict resolution strategies for simultaneous edits.
- Regularly audit sync logs to catch and resolve any discrepancies.
By leveraging external automation tools, our marketing agency can create a more flexible and powerful syncing system, tailored precisely to their workflow needs. This approach requires more technical setup but offers greater customization than Notion's built-in features.
Want to supercharge your productivity?
Unlock the full potential of Notion & Obsidian with our plugins.
Using External Sync Tools
For our marketing agency owner, several third-party tools address Notion's database sharing limitations:
- Notion2sheets: Syncs Notion databases with Google Sheets.
- Whalesync: Offers real-time, two-way sync between Notion and other platforms.
- Unito: Provides bi-directional sync between Notion and various project management tools.
- Coupler.io: Automates data transfers between Notion and other apps.
These tools are designed to handle the complexities of database synchronization and often provide more robust features than general-purpose automation platforms.
Just Use Airtable
Why Consider Airtable Over Notion
While Notion offers a versatile workspace, Airtable provides superior database functionality that might better suit their needs:
- Native filtered views: Airtable allows sharing specific views without exposing the entire base.
- Granular permissions: Control access at the table, view, and field level.
- Robust API: Easier integration with other tools and custom solutions.
- Advanced automations: More powerful built-in automation capabilities.
Setting Up a Client-Friendly System in Airtable
- Create a base for all client articles.
- Set up tables for different content types (e.g., blog posts, social media).
- Use views to filter content by client.
- Implement automations for content workflow (e.g., status updates, notifications).
- Share filtered views with clients using view-specific share links.
Migrating from Notion to Airtable
- Export the Notion database as CSV.
- Import CSV into Airtable, mapping fields appropriately.
- Set up views and permissions to mirror the Notion structure.
- Create forms for client input if necessary.
- Update internal processes and client communication.
Pros and Cons of Switching to Airtable
Pros:
- Better suited for complex database needs.
- More intuitive sharing of filtered data.
- Robust integration capabilities.
Cons:
- Less all-in-one than Notion (e.g., no built-in wiki functionality).
- Potential learning curve for team members.
- May require restructuring existing workflows.
While Airtable addresses many sharing challenges with Notion, it's important to weigh the benefits against potential disruptions.
Sharing filtered Notion databases presents unique challenges, but creative solutions are available.
The key lies in balancing data security, user experience, and workflow efficiency. As Notion evolves, we may see more native solutions for filtered database sharing, but until then, these methods offer practical workarounds for managing client-specific content effectively.
Want to supercharge your productivity?
Unlock the full potential of Notion & Obsidian with our plugins.